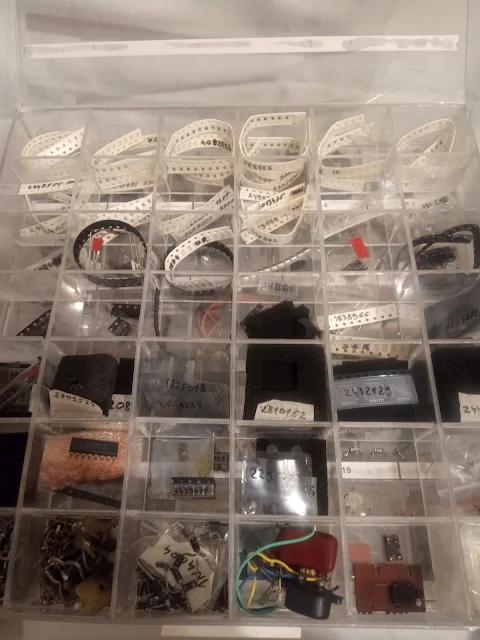
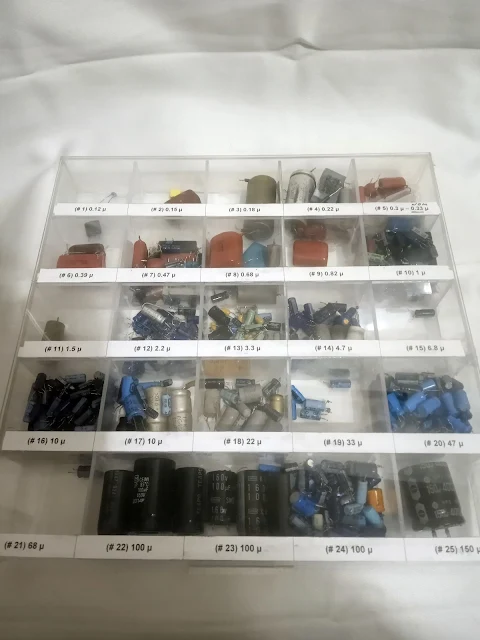
Storing and finding electronic components can be a pain. I tried many solutions over the years until I found a solution that suits my needs - making boxes from 2mm plastic sheets. The cost is very low and can be made in whatever sizes you need.
How to make a custom box for storing electronic components
The box was designed in OnShape and the project can be found here https://cad.onshape.com/documents/bdcbefb1306a25bba44fdde5/w/06b2584dee706d902beec3c1/e/dadceb10cd0a694270b8739b
You don't need to learn OnShape unless you want to use other dimensions than those provided.
All boxes have the same external size 25 x 25 cm for stacking them but the size and the number of compartments inside can vary.
Inside the CAD project you can find 2 drawing files: 5x5 rows results is 25 compartments per box and 6x7 rows, 42 compartments - 6 rows on horizontal axis and 7 on vertical.
For 25 compartments option the inner dimension is 47x47 mm and for 42 compartments 40x33 mm.
The above jig files can be printed from inside OnShape or downloaded as pdf files from below. It is important that they are printed as 1 to 1 scale. Then in the spreadsheet calculator file "Electronics Storage Box Dimension Calculator" specify how many rows and columns you desire. For example 6 columns and 7 rows.
With this setup the calculated results are: 42 number of compartments, 39mm width and 33mm height. We need 5 vertical spacers or dividers with the dimensions 244mm by 30mm, and 6 horizontal spacers with the dimension of 246mm by 30mm. After stacking them on top of each other with scotch tape, place the 256 mm paper jig on the horizontal spacers and the 244 mm jig on the vertical ones.
Notice the 2mm grooves on the paper jigs. Place some scotch tape on each one so when they are cut the paper won't tear off. I cut the grooves using a jigsaw and because the blade is under 2mm thick is a bit difficult but I don't have some better tool. A router would be better I think. Also, the cutting speed must not be too high so the plastic doesn't melt. Even so at the end I need to use a cutter with a long blade to separate them without breaking.
After the spacers are ready, place the vertical ones under the horizontal ones. This way you can pull the horizontal ones latter if you have some big components and want to join two compartments on the horizontal axis.
The dimensions for the external parts of the box can also be found in the spreadsheet calculator.
The hardest part of the this project is gluing the 4 sides of the box on the bottom part. See the CAD project to see how they are placed in relation to each other. I use superglue for this but the disadvantage is that it leaves a white deposition after drying. Good for copying the fingerprints but not very esthetic. There is glue for acrylic but I can't find it here where I live. Nevertheless I'm quite happy with the results.
How to cut acrylic or plastic sheets
This kind of plastic is very easy to cut and is in a way similar to glass cutting. I use a metal ruler and then a cutter to score a few times on the cutting marks. If the cutter blades are not good quality this won't work well. Ask me how I know. After that they can be snapped. Place the sheet on a table with the scored mark just a bit over the edge of the table. Then place some wood board above the plastic sheet and press on it to hold the plastic sheet pressed against the table. Now from this sandwich only the scored mark should be visible hanging over the table. Finally, use some narrow beam of wood long enough to press on the entire plastic sheet at once and place it near the cut and push on it hard. After a very loud bang the plastic sheet acrylic should have a perfect straight cut.
For smaller sheets this won't work so I use some pliers to remove the unwanted bit. Wearing protective glasses, use the pliers to gently push down the plastic lip from one end to the other so it can brake nicely in one piece.
Labels and the cover
The top cover is held using some wide transparent scotch tape. With the cover closed in place, place the scotch tape on the outside then on the inside.
For the labels, again i use a spreadsheet file that can be downloaded from below. After printing with a 1 to 1 scale I use a ruler and a cutter to cut the labels. Here the glue can be any cheap one.
The box label is made out from cable concealer 5cm wide where the label can be inserted.
Even though the box is made out of plastic the components are protected from ESD. Notice how the pins of the through hole parts are pressed inside a conductive foam. Also the SMD parts like microcontrollers are stored on a conductive foam or inside ESD protected tubes.
Notice how larger components can take 2 compartments or more. You don't need to make all compartments bigger if some parts are big and other small. Just break the spacers where you need to join the rows.
Each box or compartment can have a certain type of parts. E.g. only resistors or capacitors.
For capacitors, resistors and inductors I have dedicated boxes and the values are labeled so I can find the parts easy.
But how to find a part is all these boxes? Using an index file of course.
Indexing electronics parts inside storage boxes
Each box has a label with a number and each compartment has a number. A
spreadsheet index file is used and each part is associated with a box and a
compartment number. Inside a compartment there can be multiple parts if they can
fit with each one having some markings on them such as order code, values...
The index spreadsheet file can be downloaded from here as an example:
In the below video is the first box made. I left it here for entertainment purposes.
Download
Electronics Storage Box - Labels.ods


Hi! I'm Mircea Nistor, physics teacher at Theoretical High School Traian Lalescu Hunedoara, Romania. I'm mentoring my students in STEM activities, particullary robotics.
ReplyDeleteI want to share with you our solutions for components storage, a paintful problem. We use salvaged cardboard boxes (tooth paste, soap, milk and even cigarettes packages). They are free end ESD safe.
Please contact me!
Mircea Nistor, email: mircea.fizitec@gmail.com; tel/WhatsApp: +40727335129.
That's an ingenious solution. A faster alternative would be a 3D printer since they have gotten cheaper over time. For ESD protection, now I am using conductive foam and anti-static metalized bags cut in smaller shapes and sealed using a soldering gun. I have lots of these from original packaging.
Delete